
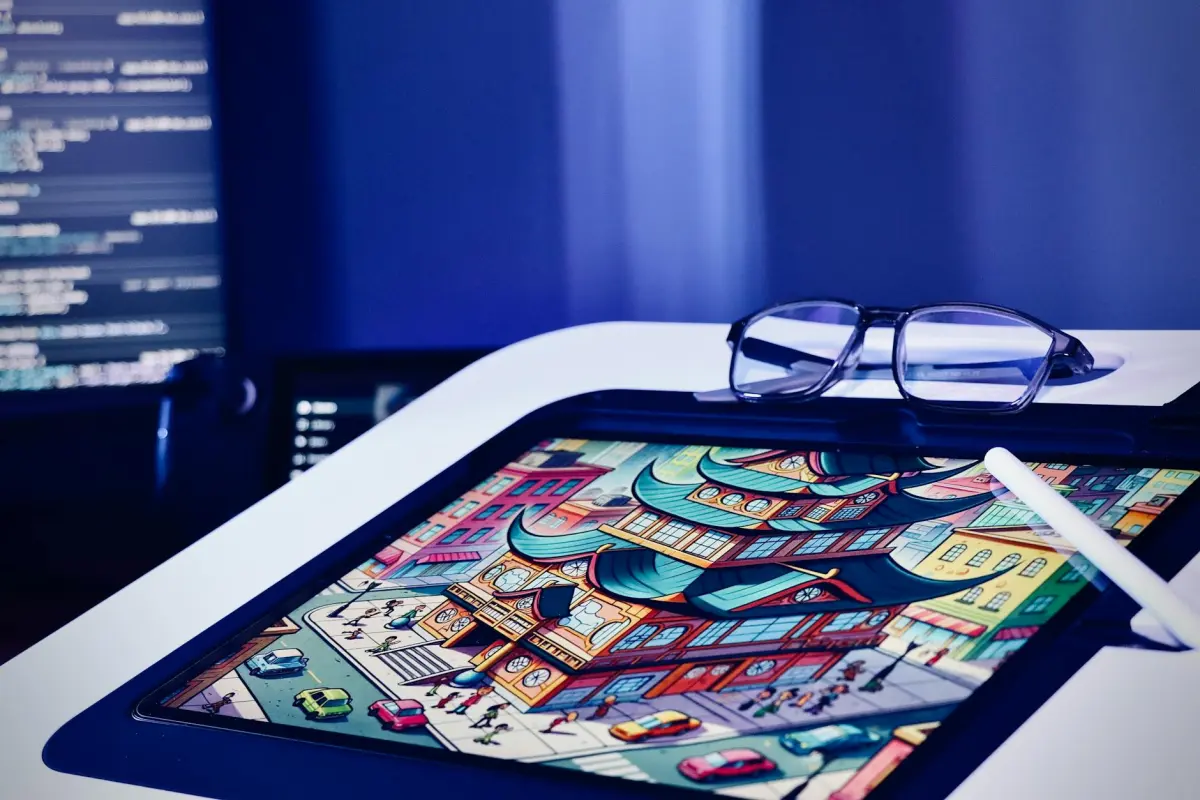

Використовуйте кліпи тривалістю 5–15 секунд і виберіть цільовий стиль: чисті контури, пласке затінення та жваву, але контрольовану палітру. Переконайтеся, що перехід між кадрами залишається плавним, щоб рух відчувався природним, а не тремтливим. Спирайтеся на вбудовану модель, налаштовану на різноманітність медіа, для отримання стабільних результатів при роздільній здатності 1080p і вище.
Щоб швидко впровадити це, зберіть правильні інструменти: вбудована модель, навчена на різноманітних медіа, екстрактор кадрів, редактор для налаштування часу та менеджер кольору. Вам знадобляться реальні медіа як вхідні дані; якщо у вас немає парних даних, використовуйте самокероване навчання для виявлення узгодженості між кадрами. Цей підхід дозволяє вам просто ітерувати, доки ви не побачите стабільні краї та стиль мультивації, легко досягаючи цілісного вигляду, який підтримує музику.
На етапі редагування контролюйте артефакти: тимчасове мерехтіння, колірний дрейф та надмірне згладжування країв. Тонко налаштуйте вагу, щоб тони шкіри залишалися реалістичними, а текстури - читабельними. Це буде виглядати цілісно, коли ви масштабуєтеся від одного кліпу до повного проекту, надаючи редакторам простір для уточнення деталей без втрати мультиваційного вигляду. Процес допомагає вам розвивати навички, поки конвеєр виконує основну частину роботи.
Заглядаючи в майбутнє, застосуйте модульний підхід: відокремте базовий прохід від налаштувань текстури та освітлення. Ви можете відкривати нові вигляди, просто змінюючи вагу стилю та повторно запускаючи конвеєр. Результати будуть плавними та стилізованими в різних медіаформатах, від соціальних кліпів до довших монтажів; для команд, які шукають послідовну естетику, це дозволить швидше публікувати матеріали та проводити постійні експерименти.
Відео-в-Відео AI: реальні сцени в мультфільми – Огляд Практичного Генератора
Рекомендація: вибирайте генератор на базі GPU з швидкими попередніми переглядами, широким набором моделей стилізації та пресетами експорту в один клік, що відповідають фінальній доставці. Пропустіть кілька коротких кліпів через інструмент і порівняйте точність руху, обробку країв та роботу з текстурами в різних стилях. Ця базова лінія інформує конвеєр, який ви будете масштабувати для виробництва без марних ітерацій, і ви можете легко покращити вигляд, щоб без зусиль відповідати цільовій аудиторії.
Що перевірити спочатку: збереження руху, чіткість країв та реалістичність текстур у різних варіантах. Використовуйте кілька демо, наданих платформою, порівнюйте вивід з вихідними кадрами та оцінюйте, чи тримається стилізація на довших фрагментах. Перевірте стабільність експорту, щоб уникнути тремтіння, та зверніться до шаблонів від renderforests та інших надійних інструментів, щоб забезпечити послідовний вигляд.
Поради з виробничого робочого процесу: встановіть фіксовану частоту кадрів (24–30 кадрів/с), застосуйте двопрохідний підхід (базова стилізація, потім корекція кольору та країв), і пакетно обробляйте кліпи для підтримки послідовності часу. Цей підхід зберігає візуальні сигнали руху та дає узгоджений фінальний потік по всій послідовності, легко масштабуючись від одного відео до бібліотеки епізодів.
Рекомендації для авторів: для влогерських або маркетингових кліпів прагніть до вигляду, який є привабливим, але читабельним на мобільних екранах. Почніть з трьох пресетів, створіть тестову стрічку тривалістю 30–60 секунд і порівняйте на різних пристроях. Експортуйте у форматі 1080p або 4K, вибираючи кодеки (H.264 або H.265) залежно від потреб платформи. Спрощений робочий процес "клік-для-гляду" може значно скоротити час виробництва, зберігаючи при цьому ваш характерний реалістичний вигляд.
Артефакти та управління ризиками: очікуйте випадкових артефактів при швидкому русі або щільних текстурах; зменшуйте силу стилізації або налаштуйте компенсацію руху, щоб мінімізувати мерехтіння. Якщо кольори дрейфують між сценами, застосуйте глобальний прохід зіставлення кольорів перед рендерингом фінального кадру. Документуйте налаштування, використані для кожного проекту, щоб спростити майбутню роботу та підтримувати візуальну консистенцію, що зберігає життя.
Вартість, ліцензування та робочі процеси: багато варіантів пропонують безкоштовний рівень з обмеженою роздільною здатністю або водяними знаками; для комерційних проектів інвестуйте в ліцензію, яка покриває виробниче використання. Віддавайте перевагу моделям, які регулярно оновлюються та надають різноманітні стилі. Переконайтеся, що експорт включає бажану роздільну здатність, бітрейт та колірний простір. Використовуйте демо для калібрування вигляду перед тим, як братися за виробничий цикл, і відстежуйте маркетинговий вплив за допомогою коротких, виміряних відео.
Як підготувати вихідний матеріал для мультивації
Структуруйте свій матеріал у стислі, керовані дією кліпи: по 6–12 секунд кожен, що містять чіткі об'єкти та передбачуваний рух для підтримки чистої стилізації. Знімайте реальні матеріали з частотою 24–30 кадрів/с, щоб зберегти природний час, а потім узгоджуйте монтаж з цільовим темпом для кінематографічного результату. Тримайте камеру стабільною за допомогою штатива або стабілізатора, щоб зменшити тремтіння, яке ускладнює контроль під час подальшої стилізації.
Стабілізація та кадрування: забезпечте стабільну витримку та експозицію, уникайте екстремального розмиття руху та зафіксуйте баланс білого, щоб зберегти колірну безперервність. Кадрування має мінімізувати різкі обрізання між переходами, забезпечуючи легке застосування шаблонів та моделей.
Освітлення та колір: знімайте при контрольованому освітленні або використовуйте розсіяне заповнення для рівномірного освітлення. Встановіть фіксований колірний профіль або нейтральний баланс білого; грейдуйте з обмеженою палітрою для підтримки естетичної консистенції стилізації. Це допомагає алгоритму застосовувати цілісний вигляд до створеного матеріалу, щоб зробити фінальний результат ближчим до бажаного.
Аудіо та візуальні сигнали руху: за потреби ізолюйте діалоги та готуйте сигнали часу для синхронізації губ, якщо це застосовно. Зберігайте передбачуваність руху камери, щоб анімації та посилання на рух чисто переносилися у фінальному стилі.
Роздільна здатність, формат та проксі: експортуйте у форматі 1080p або 4K та в співвідношенні сторін 16:9; встановіть високий бітрейт, збережіть глибину кольору та зберігайте аудіо окремо для повторного зв'язування. Створюйте проксі-версії для швидкої ітерації; коли будете готові, повторно зв'яжіть з високою роздільною здатністю для фінального рендерингу, забезпечуючи масштабований, повторюваний робочий процес, який підтримує ітеративне тестування.
Активи та робочий процес: створіть структуру багаторазових елементів – шаблони фонів, силуети, посилання на рух. Збирайте шаблони, моделі та естетичні палітри з renderforests або інших безкоштовних джерел, щоб прискорити налаштування. Плануйте ідеї для стилізації та тестуйте за допомогою коротких анімацій, щоб перевірити, наскільки добре вибрані моделі переносяться на бажаний вигляд.
Ітерація та QA: проводьте швидкі тести на короткому кліпі для оцінки часу та контролю; під час доопрацювання налаштовуйте темп, синхронізацію губ та деталі країв, доки не досягнете кінематографічного відчуття. Ведіть журнал контролю з нотатками про те, які налаштування дали найсильніші результати для кожної моделі, забезпечуючи легко повторювані цикли під час виробництва.
Найкращі вхідні формати та роздільні здатності для якісних результатів
Почніть з 4K60 MP4 (H.265) або ProRes 422 HQ для максимальної якості; глибина кольору 10 біт, якщо дозволяє джерело. Це зберігає дрібні деталі та час для перенесення стилів за допомогою ШІ. Якщо є обмеження бюджету або обладнання, 1080p60 MP4 (H.264) залишається прийнятним, хоча деталі та точність руху можуть бути знижені.
Вхідні формати, які дозволяють уникнути артефактів: MP4 у H.265/HEVC при 4K60 (або 1080p60) та Apple ProRes 422 HQ або ProRes 4444 для постобробки на Mac; зберігайте високий бітрейт в обох випадках; уникайте сильно стиснутих джерел 480p, оскільки вони погіршують деталі в анімації та стилізації.
Роздільні здатності та співвідношення сторін: віддавайте перевагу нативному 16:9; для вертикального мобільного контенту – 9:16; за можливості зберігайте 3840x2160 або 4096x2160 як вхідні дані; 1920x1080 як резервний варіант. Зберігайте частоту кадрів фіксованою на рівні 24, 30 або 60 кадрів/с; 60 кадрів/с для динамічних сцен, 24 кадри/с для кінематографічного відчуття. Якщо ви не впевнені, перегляньте метадані джерела та переконайтеся, що обрана ціль відповідає вашому вихідному пристрою; потім уніфікуйте її для всіх кліпів, щоб запобігти різким переходам. Цей підхід допомагає вам узгодити вигляд між кадрами.
Глибина кольору: рекомендовано 10 біт; 8 біт – поширений варіант; встановіть колірний простір на Rec.709; для HDR-проектів – Rec.2020; уникайте сильної грейдингу на вході; зберігайте насиченість та контрастність для підтримки подальших естетичних трансформацій. Експортуйте щонайменше 8 біт на канал у MP4 або MOV, але 10 біт легше зберігає градієнти; використовуйте логарифмічну гамму лише якщо ваш ланцюжок підтримує її.
Контейнер і аудіо: Контейнери файлів: MP4, MOV; уникайте змішування кількох потоків, що ускладнюють пайплайн. Зберігайте аудіо на частоті 48 кГц, 16-біт або 24-біт; відокремлюйте аудіо від відео під час експорту, щоб спростити роботу зі шкалою часу. В редакторі клацніть "Експорт", щоб застосувати вибраний пресет. Для продакшн-команд експортуйте високоякісний майстер-файл та легкий проксі, щоб заощадити час під час редагування та перегляду; це допоможе вашим робочим процесам відеоблогерів залишатися вчасно, економлячи час.
Перевірки якості та повторне використання: виконуйте тестові рендери на зразку кліпу, перевіряйте таймінг, колір та рух; якщо ви плануєте масштабувати, створюйте пресети, щоб ваші команди могли легко відтворювати результати. Під час експорту зберігайте майстер-файл у без втрат або з високим бітрейтом, а потім генеруйте результати для продакшн-пайплайнів. Якщо ви використовуєте пакети асетів від Renderforest, перевіряйте сумісність з 4K та колірну узгодженість. Незалежно від того, чи ви сольний творець, чи частина невеликої команди, чисті вхідні дані зменшують кількість переробок та прискорюють життєвий цикл проєкту. Пресети, створені для поширених жанрів, прискорюють налаштування.
Покроковий процес перетворення сцени в мультяшний стиль
Крок 1 – Оцінка джерела та визначення цільової концепції: виберіть кадр із лайв-екшн, відзначте ключові моменти руху та встановіть бажану стилізацію. Це створить структуру для робочого процесу та забезпечить захист від надмірної обробки.
Крок 2 – Аналіз руху та поз: відстежуйте вектори руху, перебільшуйте ключові пози та зіставляйте їх зі спрощеними силуетами. Це допоможе узгодити кінцевий вигляд на різних кадрах та підтримувати ритм.
Крок 3 – Дизайн персонажів та реквізиту: накресліть чіткі силуети, визначте відмінні риси та створіть невеликий набір повторюваних форм для головних та другорядних персонажів. Це забезпечить узгодженість концепції та зробить процес створення ефективним.
Крок 4 – Застосування шарів стилізації: виберіть натхненний аніме вигляд або сміливий стиль чорнила. Створіть структуру шарів: базова колір, тіні, світлі плями та чіткі контури, щоб досягти чудовий, цілісний вигляд.
Крок 5 – Обробка кольору та країв: виберіть стриману палітру, яка підтримує концепцію. Використовуйте пласкі кольорові блоки, потім додайте м'яку тіньову обробку, щоб створити глибину, не руйнуючи мультяшного відчуття. Цей крок зберігає краї чистими та робить результат миттєво експортованим.
Крок 6 – Перегляд, коригування та експорт: відрендеріть коротке відео або послідовність для швидкого перегляду. Перевірте узгодженість руху, точність країв та колірний баланс. За потреби скоригуйте товщину ліній або насиченість та експортуйте знову, щоб зберегти якість.
Крок 7 – Збереження багаторазового шаблону для навчання та майбутніх проєктів: збережіть структуру та правила як безкоштовний ресурс для спільноти творців. Збережений шаблон надає простий шлях для миттєвого створення стилізованих відеоасетів з нового матеріалу.
Як порівняти генератори AI-анімації: важливі функції
Рекомендація: Вибирайте генератор зі скриптовим робочим процесом, надійним захистом асетів та швидким циклом попереднього перегляду, щоб заощадити час, зберігаючи контроль над виглядом. Надавайте перевагу інструментам, розробленим для творців, щоб швидко та надійно отримувати готові результати, підтримуючи вашу роботу на кожному етапі.
Підтримка вхідних даних має значення: перевіряйте широку сумісність джерел, включаючи лайв-екшн відео, послідовності зображень та текстові підказки. Надавайте перевагу продуктам, які підтримують імпорт перетягуванням, пакетну обробку та узгоджену обробку кольору, щоб зменшити ручні редагування у вашому існуючому пайплайні.
Якість проти швидкості: оцінюйте точність, реалізм руху та поведінку освітлення. Шукайте кінематографічні пресети, регульоване освітлення, деталізацію текстур та можливість встановлювати роздільну здатність і частоту кадрів без дестабілізації виведення. Сильний варіант пропонує робочий процес трансформації, який залишається чудовим під тиском.
Налаштування та редагування: перевірте, як організована структура та чи є пресети модульні. Перевірте детальні елементи керування для контурів, тіней та кривих руху, а також доступну систему скриптів або макросів, яка дозволяє автоматизувати повторювані редагування з мінімальними зусиллями.
Контроль та автоматизація: переконайтеся у наявності чистого інтерфейсу з видимим контролем над параметрами, можливістю зберігати та повторно використовувати пресети, а також надійними параметрами повернення. Шукайте гачки автоматизації, які дозволяють інтегруватися у ваш скриптовий робочий процес, достатньо автоматизації, щоб прискорити виробництво.
Захист та ліцензування: підтвердьте параметри водяних знаків, умови ліцензування та права на повторне використання для комерційних продакшн-пайплайнів. Рендеринг на базі GPU або хмарний рендеринг повинен містити чіткі умови, щоб ви могли планувати маркетинг та розповсюдження без сюрпризів.
Співпраця для роботи відеоблогерів та маркетингу: оцінюйте мультикористувацьке редагування, спільний доступ до проєктів та функції попереднього перегляду в реальному часі, які підтримують зворотний зв'язок "точно вчасно". Ці можливості допомагають перетворювати бріфи на готовий до публікації контент та підтримувати узгоджений вигляд епізодів.
Обладнання та продуктивність: порівняйте вимоги до обчислень, хмарні та локальні опції, а також чи є рішення на базі GPU. Переконайтеся, що ваше налаштування відповідає необхідним можливостям RAM та GPU, щоб уникнути вузьких місць під час виробництва.
Ціна та повернення інвестицій: співставте рівні з очікуваним обсягом виведення, якістю виведення та постійною підтримкою. Надавайте перевагу продуктам з прогнозованими витратами, щедрими обмеженнями пробного періоду та чіткими ліцензіями, щоб ваша команда могла масштабуватися без сюрпризів, особливо для маркетингових кампаній.
Чек-лист для швидкої оцінки: формати введення, керування точністю, структура, глибина налаштування, інструменти редагування, підтримка скриптів, опції захисту, формати виведення та інтеграційні гачки для вашого робочого процесу. Використовуйте цю матрицю для вибору продукту, який відповідає вашим потребам.
Поради щодо уникнення артефактів та підтримки узгодженості руху
Почніть з офлайн-проходу тривалістю 2–4 секунди на простому кадрі, використовуючи ваш AI-інструментарій відео-в-відео. Рендеринг у цільовій роздільній здатності після швидкої перевірки якості, налаштування полів руху та перевірка артефактів у циклічному сегменті. Зберігайте цей тестовий зразок, який відображає вашу кінцеву концепцію, щоб ви могли налаштувати параметри перед остаточним виробництвом.
- Дрейф руху та вирівнювання кадрів: прагніть до ≤1.5 пікселя зсуву на кадр та ≤0.2° обертання. Використовуйте вирівнювання оптичного потоку та 3-кадровий прохід часового згладжування (0.65–0.8) для підтримки узгодженості протягом секунд.
- Стабільність країв та контурів: застосовуйте легке шумозаглушення, що зберігає краї; обмежте різкість, щоб уникнути ореолів; тримайте контури персонажів чіткими, щоб уникнути мерехтіння під час переходів руху.
- Керівництво за шаблоном для збереження стилю: виберіть невеликий набір шаблонів для стилю руху та переконайтеся, що трансформації зберігають цілісність силуету. Повторно використовуйте пресети, щоб уникнути дрейфу та спростити виробництво, допомагаючи вам трансформувати ідеї, не втрачаючи ідентичності персонажа.
- Узгодженість кольору та освітлення: зафіксуйте баланс білого за фіксованим еталоном; дотримуйтесь стабільної колірної палітри. Контролюйте deltaE між кадрами (ціль ≤3), щоб підтримувати однорідний вигляд послідовності.
- Роздільна здатність та глибина кольору: працюйте з 10-бітним кольором, де це можливо; вибирайте достатньо високий бітрейт, щоб запобігти появі смуг; підтримуйте послідовну дискретизацію кольоровості з вашим пайплайном (4:2:2 або 4:2:0) для плавних градієнтів під час руху.
- Конфіденційність та офлайн-робочий процес: обробляйте локально під час навчання та початкових етапів виробництва; уникайте хмарного експорту до фінального проходу, щоб зберегти конфіденційність вихідних матеріалів.
- Перевірки якості та метрики: виконуйте бенчмарки SSIM та PSNR на 3–5 коротких інтервалах на кліп; прагніть до SSIM ≥ 0.92 та PSNR ≥ 28 дБ; позначайте кадри з великими часовими відмінностями для цільових виправлень.
- Цикл ітеративного перегляду: ведіть журнал змін параметрів та результатів; перетворюйте успішні налаштування на повторно використовувані шаблони, щоб кожен міг миттєво відтворити результат.
- Виявлення артефактів під час перегляду: увімкніть простий детектор артефактів для позначення мерехтіння, зсувів кольору та артефактів країв; усуньте позначені кадри перед переходом до фінального виробництва.
- Життєвий цикл та узгодженість історії: переконайтеся, що коригування зберігають концепцію творця та узгодженість персонажів, щоб наратив залишався захоплюючим, а візуальні елементи залишалися плавними на всіх кадрах.


