명확하고 단 하나의 내러티브 큐로 장면, 액션, 분위기를 정의하고 시작하세요. AI 클립 도구로 테스트하여 즉각적인 결과물을 얻으세요.
다국어 팀의 경우 번역을 통해 큐를 모델이 자동으로 해석할 수 있는 구조화된 명령 세트로 변환할 수 있습니다. 표준 태그 방식을 사용하여 혼란을 줄이고 시간을 절약할 수 있습니다.
간결한 파일 패키지를 준비하세요. 패키지에는 이미지, 오디오, 짧은 메모가 포함됩니다. 모든 것을 공유 폴더에 보관하면 편집 및 협업이 간편해집니다.
솔직하고 데이터 기반의 접근 방식으로 변형을 테스트하세요. 모든 실행에서 얻은 인사이트는 흥미로운 결과와 성공을 이끄는 요인을 파악하는 데 도움이 됩니다.
다양한 청중에 맞게 결과물을 맞춤 설정하세요. 내러티브를 개인화하고, 페이싱을 조정하며, 시각적 스타일을 맞춤 설정하여 매력을 높이세요.
스토리 기반 형식은 브이로거에게 가장 효과적입니다. 빠른 스토리보드를 만들고, 키보드에서 연습하며, 립싱크를 확인하여 진정성을 유지하세요.
인기 있는 워크플로는 원활한 편집 프로세스를 강조합니다. 계획, 반복, 그리고 네이티브 플레이어에서의 미리보기 검토를 통해 최종 결과물이 흥미롭도록 하세요.
마지막 단계에서는 자막, 메타데이터, 라이선스 정보를 포함하는 공유 패키지를 생성하여 플랫폼 간 배포를 지원하세요.
시청 지속 시간, 완료율, 공유와 같은 지표로 성공을 추적하세요. 이러한 인사이트를 사용하여 워크플로를 조정하고 향후 제작을 개선하세요.
텍스트 프롬프트에서 동영상까지: 실용적인 로드맵
한 문장의 시각적 브리프와 일치하는 샷 리스트로 시작하세요. 핵심 스토리 아크가 유지되도록 진행하기 전에 모든 가용 자산을 정리하세요.
핵심 구성 요소를 파악하세요: 간결한 설명, 스토리보드, 조명 계획, AI 기반 렌더링 엔진. 텍스처, 모션, 사운드에 대한 역할을 할당하고 워크플로의 일부에 매핑하세요.
직관적인 인터페이스를 선택하고 키보드 단축키를 활성화하여 반복을 가속화하세요. 3단계 타임라인을 설정하세요: 시작, 중간, 끝. 페이싱을 스토리 아크에 맞추세요.
짧은 클립을 제작하고, 각 편집 후 감사를 수행하며, 시각 효과에 맞게 편집 전환을 개선하여 빠르게 반복하세요. 렌더링을 보고 인사이트를 수집하여 다음 시도를 개선하세요.
장면 간 조명 일관성을 모니터링하세요. 색상, 노출, 분위기를 조정하여 전체적인 느낌을 통일성 있게 유지하세요. 감사를 사용하여 핵심 개념과의 일치 여부를 확인하세요.
출력물을 사용자 지정하세요: 해상도, 프레임 속도, 종횡비를 선택하세요. 파일 크기가 관리 가능하도록 하세요. 변형을 내보내고 빠른 미리보기를 비교하세요.
한 달간의 주기를 계획하고, 아이디어 구상, 개선, 검증에 일수를 할당하세요. 반복 작업을 실질적으로 유지하기 위해 차고 스타일의 작업 공간을 유지하세요.
프로세스를 감사 가능하게 유지하세요: 결정을 기록하고, 변경 사항을 태그하고, 버전 관리된 아카이브를 유지하세요. 매월 얻는 인사이트는 향후 주기를 안내하고 AI 기반 동영상 제작 전문성을 향상시킵니다.
전체 파이프라인은 강력한 시작, 시각 효과와 내러티브의 일치, 감사 및 조정이라는 규율 잡힌 루틴에 달려 있습니다. 이 접근 방식은 결과물을 직관적이고 반복 가능하게 만듭니다.
동영상의 목표, 대상, 플랫폼 정의

단 하나의 구체적인 목표와 핵심 대상을 설정하세요. 예: 이상적인 시청자에게 X에 대해 60초 안에 교육하여 특정 행동을 유도합니다. 시청 시간, 유지율, 댓글 질문과 목표를 연계하세요. 목표에 맞는 형식을 선택하세요: 짧은 팁에는 짧은 형식, 깊이 있는 스토리는 긴 형식. 제작 및 번역의 비용 및 가격 책정 고려 사항을 검토하고 팀에서 완전히 사용할 수 있는 도구를 선택하세요. 이 접근 방식은 지역에 관계없이 확장 가능합니다.
연령, 관심사, 콘텐츠가 해결하는 문제 등 다양한 부문의 페르소나를 정의하세요. 시청자가 자주 묻는 질문을 매핑하고, 적절한 시점에 간결하게 답변하도록 메시지를 맞춤 설정하세요. 지역 도달 범위를 계획하는 경우 번역 옵션을 계획하세요: 정확성과 톤을 위해 수동으로 번역하거나, 속도가 중요할 때는 자동화된 도구를 사용하세요. 이 접근 방식은 다양한 기기와 상황에서 시청하는 사용자와 일치합니다.
플랫폼 선택은 형식과 전달 방식을 결정합니다. 세로 클립인 쇼츠는 쇼츠, 틱톡, 릴에 적합하며, 긴 영상은 주요 채널과 더 넓은 시청자에게 적합합니다. 음성 오버를 사용할지, 사운드 디자인과 화면 텍스트로 스토리를 전달할지 결정하세요. 음성 오버 없이 게시하는 경우 시각 효과와 자막에 의존하여 소통하세요. 사운드와 자막이 브랜드와 일치하도록 하고, 타겟 시청자에게 가장 효과적인 참여를 유도하는 설정을 선택하세요. 선호하는 제공업체의 가격 책정 및 서비스 옵션을 검토하여 계획을 브랜드에 맞춰 예산 내에서 유지하세요.
일관된 결과물을 보장하기 위한 구체적인 프롬프트 및 템플릿 만들기

모든 제작 과정에서 일관된 비주얼과 페이싱을 보장하기 위해 고정된 마스터 템플릿과 재사용 가능한 명령 세트를 사용하세요. 매주 추측할 필요가 없습니다. 조명, 오디오, 자막을 매번 재조정하여 가장 신뢰할 수 있는 결과를 얻을 수 있습니다. 각 자산 유형에 대해 짧은 형식의 청사진으로 시작한 다음, 일관성을 깨뜨리지 않고 프로젝트별로 사용자 지정하세요.
- 마스터 템플릿 구조
- 핵심 필드: 장면, 환경, 액션, 지속 시간, 조명, 오디오, 음악, 캡션, 자막, 고정된 크레딧 블록.
- 출력 메타데이터: 해상도(1080x1920), 프레임 속도(30fps), 종횡비(세로), 파일 명명 규칙.
- 자산 안전: 개발 시작 전에 모든 구성 요소에 대한 라이선스 정보 및 소스.
- 반복 가능한 결과에 대한 구체적인 명령 형식
- 기본 명령: scene=[장면 설명], tone=[중립/활기찬], length=[짧음], lighting=[부드러움/전체], audio=[음성 오버/없음], music=[장르], captions=[켜짐/꺼짐], subtitles=[켜짐/꺼짐], types=[애니메이션/실사], credits=[브랜드 링크 포함], output=[1080x1920].
- 재사용 가능한 템플릿 블록:
- 조명 사전 설정: 밝은 키, 필, 백라이트; 색 보정: 차가움/따뜻함;
- 캡션 스타일: 글꼴, 크기, 위치;
- 자막 타이밍: 0~100ms 오프셋, 최대 2줄. - 테스트 후크: 렌더링 후 분석 창을 지정하여 인사이트를 캡처하고 조정을 유도합니다.
- 출력 유형별 템플릿 변형
- 애니메이션 설명: 짧고 간결하며 12~15초, 반복 가능; 명확한 캡션과 간단한 단계별 흐름 강조.
- 제품 데모: 실제 같은 조명, 부드러운 모션, 18~24초; 브랜드 및 음악 크레딧 포함.
- 스크린샷 튜토리얼: 깔끔한 UI, 고대비 캡션, 항상 자막 켜짐; 지속 시간 20~28초.
- 템플릿 구성 요소 및 제약 조건
- 조명: 실제 같은 느낌을 유지하기 위해 일관된 키 조명 비율(2:1 또는 3:1) 사용.
- 캡션 및 자막: 항상 켜짐, 오디오와 동기화, 읽기 쉬운 산세리프 글꼴; 캡션당 최대 2줄.
- 오디오 및 음악: 분위기를 위해 배경 트랙 할당, 20~40% 출력에는 음성 오버 예약; 편집에 시간 할당.
- 애니메이션 대 실사: 모션 키(이징, 이징 아웃), 전환 세트, 로고 공개 시간 사전 정의.
- 크레딧 및 브랜딩: 항상 브랜드 이름, 핸들(틱톡), 가벼운 CTA가 포함된 종료 프레임 포함.
- 구성 요소: 로고, 오버레이 텍스트, 진행률 표시줄, 선택적 CTA 카드.
- 재사용 가능한 구체적인 예제
- 템플릿 A (틱톡 친화적인 애니메이션): scene="사무실 책상 시작: 빠른 제품 공개"; tone="친근함"; length="12s"; lighting="부드러운 키 + 필"; music="신나는 팝"; captions="켜짐, 둥근 모서리"; subtitles="켜짐"; types="애니메이션"; credits="끝에 브랜드 크레딧"; output="1080x1920".
- 템플릿 B (현실적인 제품 데모): scene="장면 속 제품 사용"; tone="정보 제공"; length="20s"; lighting="균형 잡힌"; audio="음성 오버 선택 사항"; music="없음 또는 미묘함"; captions="켜짐"; subtitles="켜짐"; types="실사"; credits="브랜드 및 음악 크레딧"; output="1080x1920".
- 템플릿 C (스크린샷 가이드): scene="앱 둘러보기"; tone="명확함"; length="24s"; lighting="중립"; audio="내레이션"; captions="켜짐"; subtitles="켜짐"; types="실사"; credits="브랜드, 링크"; output="1080x1920".
- 게시 전에 짧은 루브릭을 사용하여 목표와의 일치 여부를 분석합니다: 명확성, 속도, 브랜드 일관성; 필요한 경우 조명, 캡션 및 음악을 조정합니다.
- 인사이트 수집: 어떤 템플릿이 가장 많은 참여를 유도하는지 추적합니다. 편집 시간과 추가 구성 요소에 대한 요구 사항을 메모합니다.
- 템플릿을 다듬고 출력 유형을 확장하기 위해 주간 검토 주기(주) 및 월별 계획(월)을 수행합니다.
- 라이브 라이브러리 유지: 유형별로 6~12개의 명령 블록을 저장합니다. 분위기, 대상, 플랫폼(틱톡 포함)별로 태그를 지정합니다.
- 편집을 간결하게 유지: 미리 설정된 편집 단계를 사용하여 불필요한 프레임을 잘라내고 핵심 메시지를 보존합니다.
- 비용과 효과의 균형: 가장 강력한 템플릿은 초기 비용이 가장 많이 들 수 있지만 나중에 재작업을 줄입니다. 빠른 반복을 위해 몇 가지 비용 효율적인 변형을 계획합니다.
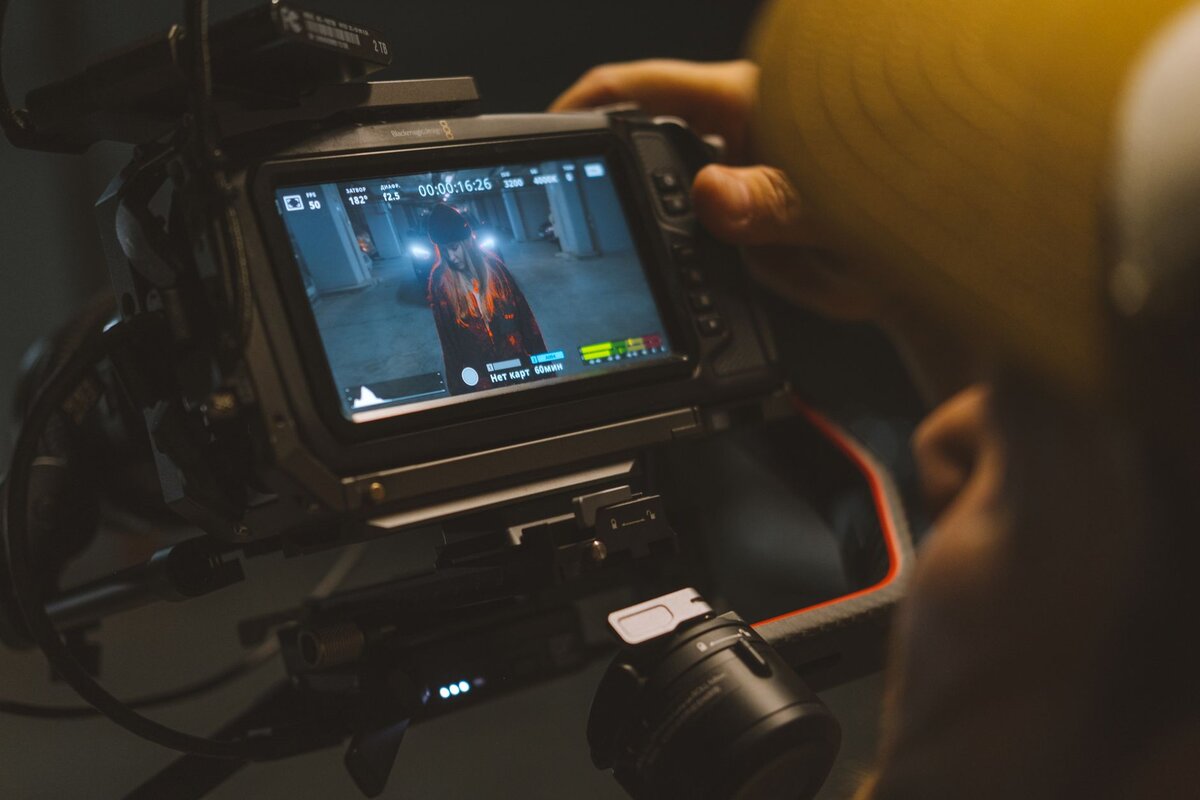
AI 동영상 생성 설정 선택: 해상도, 프레임 속도, 길이
권장 사항: 대부분의 플랫폼에서 잘 작동하는 명확하고 브랜드에 맞는 동영상을 제공하기 위해 1080p 해상도, 16:9 종횡비, 30fps, 60초 길이를 설정합니다.
이러한 제어 기능은 효율적인 편집기 워크플로를 위해 구축되었으며 기존 프로젝트에서 사용할 수 있으며 일시 중지, 스토리 속도 및 규모를 지원하는 일관된 형식으로 직접 변환됩니다. 이 접근 방식은 시청자 기대를 이해하고 참여를 유도합니다.
- 해상도 및 종횡비: 광범위한 호환성을 위해 16:9 종횡비의 1080p; 플랫폼별 재생 및 브랜드별 시각 효과를 위해 제작되었으며; 단일 내보내기에서 일관성을 유지합니다. 세로 또는 정사각형 출력이 필요한 경우 기본 파일은 그대로 두고 전용 변형을 만드십시오.
- 프레임 속도: 기본 30fps; 24fps는 영화 같은 느낌을 제공합니다. 60fps는 데모에서 모션을 개선합니다. 스토리 내내 꾸준한 흐름을 유지하기 위해 프레임 속도를 일시 중지 및 전환에 맞추십시오. 모션 끊김 없이 플랫폼에서 재생 가능한 형식이 유지되도록 합니다.
- 길이 및 속도: 기본 60초. 티저 또는 마이크로 광고의 경우 15~30초로 단축합니다. 심층 설명의 경우 90초로 확장합니다. 명확한 시작과 끝을 계획합니다. 단일 내러티브 호를 유지하고 리듬을 깨는 지나치게 긴 일시 중지를 피합니다.
내보내기 형식 및 워크플로: MP4, H.264 비디오 및 AAC 오디오로 내보냅니다. 이 형식은 널리 사용 가능하며 편집기 친화적입니다. 색 공간, 비트 전송률 및 오디오 레벨이 정책 요구 사항과 일치하는지 확인합니다. 단일 파일 내보내기는 플랫폼에서의 직접 배포를 지원하고 제작 요구 사항에 따라 확장됩니다.
- 제작 준비 체크리스트: 플랫폼 제한(길이, 파일 크기)을 확인하고, 기기 간 재생을 테스트하고, 일시 중지가 슬라이드 전환과 일치하는지 확인하고, 브랜드별 스타일을 확인하고, 선택한 플랫폼에서 배포할 단일 파일을 준비합니다.
- 구현 참고 사항: 시청자를 이해하는 애셋의 경우 튜토리얼에서 재사용할 수 있는 사전 설정을 사용합니다. 편집기의 기능을 사용하여 인사이트를 일관된 출력으로 변환합니다. 이를 통해 효율성을 높이고 플랫폼 활성화를 지원합니다.
1,600만 개 이상의 라이브러리에서 스톡 애셋 큐레이션 및 라이선스 관리
메타데이터 필터를 사용하여 1,600만 개 이상의 라이브러리를 스캔하여 전문적인 조명을 갖춘 브랜드별 AI 생성 애셋을 찾으십시오.
라이선스 유형에는 로열티 프리, 권리 관리, 편집 용 고유 라이선스가 포함됩니다. 조직 정책에 따라 라이선스 상태 태그와 만료일을 첨부합니다.
깨끗한 인터페이스를 사용하여 스크립트, 캡션, 유튜브, 재사용 가능성 등의 키워드로 애셋을 태그합니다. 클립 간에 쉽고 원활하게 재사용할 수 있도록 합니다.
clipanything 및 기타 도구를 사용하여 큐레이션의 초기 단계를 가속화하고 기술 오버헤드를 줄이면서 참여를 유도하는 출력을 가능하게 합니다.
평가된 애셋 카탈로그 및 라이선스 원장을 유지합니다. 콘텐츠를 브랜드별로 유지하고 유튜브 판매 및 기타 채널에 대한 규정 준수를 위해 만료, 재사용 권한 및 라이선스 갱신을 추적합니다.
체크포인트로 반복 가능한 생산 워크플로 설정
고정되고 반복 가능한 사이클 잠금: 계획, 사전 비행, 제작, 검토, 전달, 버전 관리된 애셋 라이브러리 및 편집자를 위한 명확한 인수인계.
모든 애셋에 대한 단일 신뢰 형식과 공통 레이아웃 템플릿을 채택하여 표준화된 색상 규칙, 배경 요소 및 AI 생성 출력에 대한 정책 준수 접근 방식을 포함한 사후 작업을 가속화합니다. 일관성을 유지하기 위해 애셋 유형(썸네일, B-롤, 오버레이)을 포함합니다.
제작에서 편집자가 재사용할 수 있는 출력 템플릿을 할당합니다. 스크립팅 또는 색상 결정과 같은 모델을 통합하고 수동 재작업 없이 일관된 기준선에 필터 및 효과를 적용합니다.
자동화를 주도하는 체크포인트 주기를 설정합니다. 사전 비행은 입력을 검증하고, 제작은 AI 생성 클립으로 렌더링하고, 그레이딩은 색상 및 배경 효과를 다듬고, 전달은 최종 애셋을 프로그램에 맞게 형식화합니다. 흐름을 자동으로 진행하거나 일시 중지하는 신호가 있습니다.
유튜버 및 쇼의 경우 신뢰할 수 있는 정책과 사용 가능한 템플릿을 유지하여 브랜드 및 목소리를 유지하면서 주기를 단축합니다.
| 체크포인트 | 초점 | 소유자 | 출력 | 신호 |
|---|---|---|---|---|
| 사전 비행 | 텍스트 입력, 애셋 확인, 형식 준수 | 편집자 | 검증된 계획 + 애셋 | 제작 가능 |
| 제작 | AI 생성 클립으로 렌더링, 필터 적용 | 편집자 | 원시 렌더 | 그레이딩 준비 |
| 그레이딩 | 색상, 배경, 깜박임 신호, 효과 | 그레이더 | 색상 보정, 규정 준수 클립 | 승인됨 |
| 전달 | 형식, 레이아웃, 패키징 | 편집자 | 프로그램용 최종 애셋 준비 | 게시됨 |