
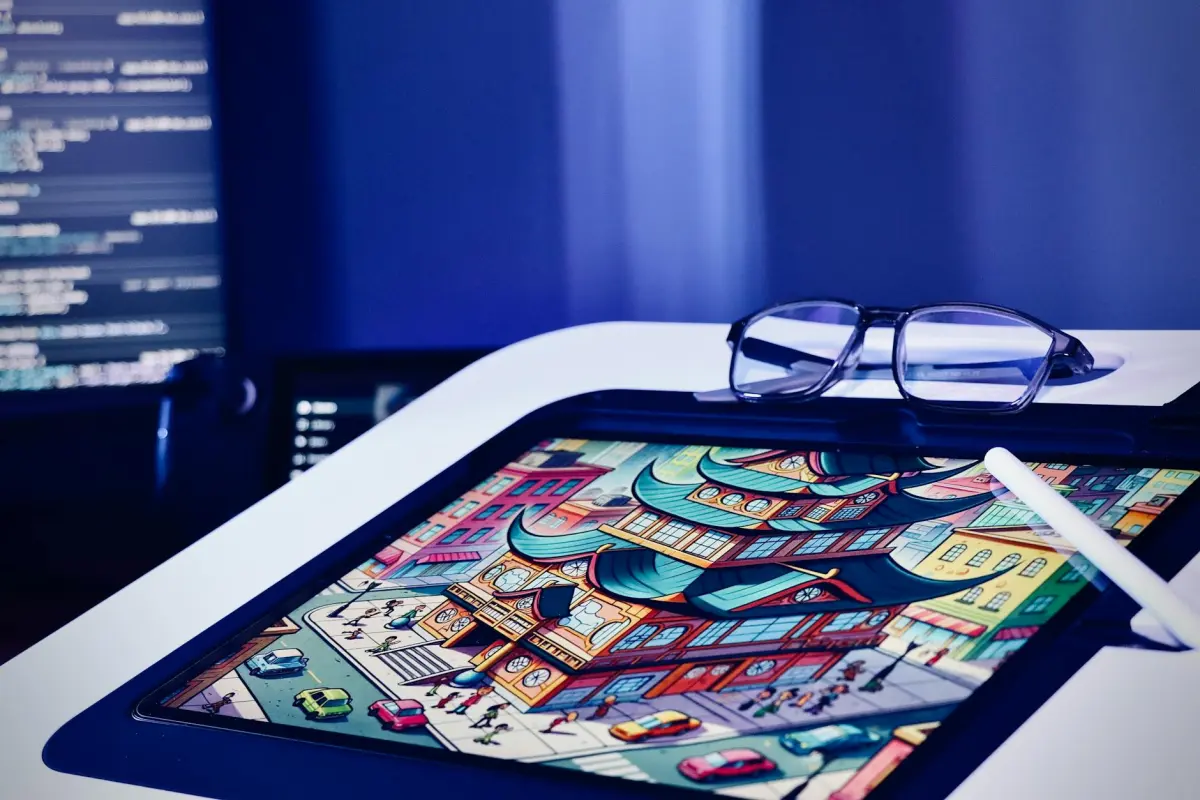

Utilisez des clips de 5 à 15 secondes et sélectionnez un style cible : contours nets, aplats, et une palette vive mais contrôlée. Assurez-vous que la transition entre les images reste fluide, afin que le mouvement paraisse naturel plutôt que saccadé. Reposez-vous sur un modèle intégré optimisé pour la diversité des médias afin de fournir des résultats cohérents à 1080p et plus.
Pour mettre cela en œuvre rapidement, rassemblez les bons outils : un modèle intégré entraîné sur des médias diversifiés, un extracteur d'images, un éditeur pour le timing, et un gestionnaire de couleurs. Vous aurez besoin de médias en prise de vues réelles en entrée ; si vous manquez de données appariées, utilisez l'apprentissage auto-supervisé pour découvrir l'alignement entre les images. Cette approche vous permet d'itérer jusqu'à ce que vous observiez des contours cohérents et un style de cartoonisation, livrant sans effort un look homogène qui soutient les indications musiques.
En phase d'édition, surveillez les artefacts : scintillement temporel, dérive des couleurs et lissage excessif des contours. Ajustez finement le poids pour que les tons de peau restent réalistes et que les textures restent lisibles. Cela aura un aspect homogène lorsque vous passerez d'un clip unique à un projet complet, laissant aux monteurs la liberté d'affiner les détails sans sacrifier l'ambiance cartoon. Le processus vous aide à acquérir des compétences pendant que le pipeline gère la majeure partie du travail.
En perspective, adoptez une approche modulaire : gardez le passage de base séparé des ajustements de texture et d'éclairage. Vous pouvez découvrir de nouveaux looks simplement en échangeant les poids de style et en relançant le pipeline. Les résultats seront fluides et stylisés sur différents formats de médias, des clips sociaux aux montages plus longs ; pour les équipes à la recherche d'une esthétique cohérente, cela permettra une publication plus rapide et une expérimentation continue.
Vidéo-à-Vidéo IA : Scènes réelles vers Cartoons – Revue Pratique du Générateur
Recommandation : choisissez un générateur basé sur GPU avec des aperçus rapides, une large gamme de modèles de stylisation, et des préréglages d'exportation en un clic qui correspondent à la livraison finale. Lancez plusieurs clips courts dans l'outil et comparez la fidélité du mouvement, le traitement des contours et la gestion des textures selon les styles. Cette base informe le pipeline que vous développerez pour la production sans itérations inutiles, et vous pouvez facilement affiner le look pour qu'il corresponde sans effort au public cible.
Ce qu'il faut tester en premier : la préservation du mouvement, la netteté des contours et le réalisme des textures parmi les options. Utilisez plusieurs démonstrations fournies par la plateforme, comparez la sortie aux images sources, et jugez si la stylisation tient sur des plans plus longs. Vérifiez la stabilité de l'exportation pour éviter les saccades, et référez-vous aux modèles de renderforests et d'autres outils fiables pour garantir une apparence cohérente.
Conseils pour le flux de production : définissez une fréquence d'images fixe (24–30 ips), appliquez une approche à deux passages (stylisation de base, puis affinage des couleurs et des contours), et traitez les clips par lots pour maintenir la cohérence du timing. Cette approche préserve les indices de mouvement et produit un flux final cohérent sur une séquence, tout en s'adaptant facilement d'une vidéo unique à une bibliothèque d'épisodes.
Directives prêtes pour le créateur : pour les clips de vlogueur ou de marketing, visez un look attrayant mais lisible sur les écrans mobiles. Commencez avec trois préréglages, produisez un court métrage de test de 30 à 60 secondes, et comparez sur différents appareils. Exportez en 1080p ou 4K, en choisissant les codecs (H.264 ou H.265) en fonction des besoins de la plateforme. Un flux de travail simplifié « cliquer pour styliser » peut réduire considérablement le temps de production tout en conservant votre style distinctif et réaliste.
Artefacts et gestion des risques : attendez-vous à des artefacts occasionnels avec des mouvements rapides ou des textures denses ; réduisez la force de stylisation ou ajustez la compensation de mouvement pour minimiser le scintillement. Si les couleurs dérivent entre les scènes, appliquez un passage global de correspondance des couleurs avant de rendre le montage final. Documentez les paramètres utilisés pour chaque projet afin de simplifier le travail futur et de maintenir une cohérence visuelle préservant la vie.
Coût, licences et flux de travail : de nombreuses options offrent un niveau gratuit avec une résolution limitée ou des filigranes ; pour les projets commerciaux, investissez dans une licence qui couvre l'utilisation en production. Privilégiez les modèles qui se mettent à jour régulièrement et fournissent des styles diversifiés. Assurez-vous que l'exportation inclut votre résolution, débit et espace colorimétrique préférés. Utilisez les démonstrations pour calibrer le look avant de vous engager dans une série de production et suivez l'impact marketing avec des vidéos courtes et mesurées.
Comment préparer les métrages sources pour la cartoonisation
Structurez vos métrages en clips concis et axés sur l'action : 6 à 12 secondes chacun, présentant des sujets clairs et des mouvements prévisibles pour soutenir une stylisation nette. Capturez le matériel en prise de vues réelles à 24-30 ips pour préserver un timing naturel, puis alignez les montages sur le tempo cible pour un résultat cinématographique. Maintenez la caméra stable à l'aide d'un trépied ou d'un stabilisateur pour réduire les saccades, ce qui complique le contrôle lors de la stylisation ultérieure.
Stabilisation et cadrage : assurez une vitesse d'obturation et une exposition constantes, évitez le flou de mouvement extrême et verrouillez la balance des blancs pour préserver la continuité des couleurs. Le cadrage doit minimiser les recadrages abrupts entre les transitions, permettant une application facile des modèles et des préréglages.
Éclairage et couleurs : filmez sous un éclairage contrôlé ou utilisez un éclairage d'appoint diffus pour obtenir une illumination uniforme. Définissez un profil de couleur fixe ou une balance des blancs neutre ; réalisez l'étalonnage avec une palette limitée pour soutenir la cohérence esthétique pour la stylisation. Cela aide l'algorithme à appliquer un look cohérent sur les métrages créés, afin que le résultat final soit plus proche du look cible.
Audio et indices de mouvement : isolez le dialogue si nécessaire et préparez des indices de timing pour la synchronisation labiale si applicable. Gardez le mouvement de la caméra prévisible afin que les animations et les références de mouvement se traduisent clairement dans le style final.
Résolution, format et proxys : exportez en 1080p ou 4K et en format 16:9 ; définissez un débit élevé, préservez la profondeur de couleur et conservez l'audio séparément pour la reliaison. Créez des versions proxy pour une itération rapide ; lorsque vous êtes prêt, reliez aux hautes résolutions pour le rendu final, assurant un flux de travail évolutif et répétable qui soutient les tests itératifs.
Actifs et flux de travail : construisez une structure d'éléments réutilisables – modèles d'arrière-plan, formes de silhouette, références de mouvement. Rassemblez des modèles, des préréglages et des palettes esthétiques de renderforests ou d'autres sources gratuites pour accélérer la configuration. Planifiez des idées de stylisation et testez avec de courtes animations pour vérifier à quel point les modèles choisis se traduisent bien dans le look cible.
Itération et assurance qualité : effectuez des tests rapides sur un clip court pour évaluer le timing et le contrôle ; tout en affinant, ajustez le rythme, la synchronisation labiale et le détail des contours jusqu'à obtenir une sensation cinématographique. Tenez un journal de contrôle avec des notes sur les paramètres qui ont donné les meilleurs résultats pour chaque modèle, permettant des cycles facilement reproductibles pendant la production.
Meilleurs formats d'entrée et résolutions pour des résultats de qualité
Commencez avec du 4K60 MP4 (H.265) ou ProRes 422 HQ pour une qualité maximale ; profondeur de couleur 10 bits si la source le permet. Cela préserve les détails fins et le timing pour les transferts de style assistés par IA. S'il existe des limites de budget ou de matériel, le 1080p60 MP4 (H.264) reste acceptable, bien que le détail et la fidélité du mouvement puissent être réduits.
Formats d'entrée qui évitent les artefacts : MP4 en H.265/HEVC à 4K60 (ou 1080p60) et Apple ProRes 422 HQ ou ProRes 4444 pour les flux de travail post-production sur Mac ; conservez un débit élevé dans les deux cas ; évitez les sources de 480p fortement compressées car elles dégradent les détails dans les animations et la stylisation.
Résolutions et rapports d'aspect : préférez le 16:9 natif ; pour le contenu mobile vertical, le 9:16 ; conservez 3840x2160 ou 4096x2160 en entrée autant que possible ; 1920x1080 en fallback. Maintenez les fréquences d'images fixes à 24, 30 ou 60 ips ; 60 ips pour l'action, 24 ips pour une sensation cinématographique. Si vous n'êtes pas sûr, regardez les métadonnées source et assurez-vous que la cible choisie correspond à votre appareil de sortie ; unifiez ensuite sur tous les clips pour éviter les transitions choquantes. Cette approche vous aide à faire correspondre le look entre les plans.
Profondeur de couleur : 10 bits recommandé ; 8 bits courant ; définissez l'espace colorimétrique sur Rec.709 ; pour les projets HDR, Rec.2020 ; évitez un étalonnage intensif en entrée ; maintenez la saturation et le contraste pour soutenir les transformations esthétiques ultérieures. Exportez au moins 8 bits par canal en MP4 ou MOV, mais le 10 bits préserve plus facilement les dégradés ; utilisez le gamma log uniquement si votre chaîne le prend en charge.
Conteneur et audio : Conteneurs de fichiers : MP4, MOV ; éviter de mélanger plusieurs flux qui confondent le pipeline. Conserver l'audio à 48 kHz, 16 bits ou 24 bits ; séparer l'audio de la vidéo lors de l'exportation pour simplifier la gestion de la timeline. Dans l'éditeur, cliquez sur exporter pour appliquer le préréglage choisi. Pour les équipes de production, exportez un master de haute qualité et un proxy léger pour gagner du temps lors du montage et de la révision ; cela permet à vos flux de travail de vlogger de rester dans les temps, ce qui fait gagner du temps.
Contrôles qualité et réutilisation : effectuez des rendus de test sur un clip d'échantillon, vérifiez le timing, les couleurs et les mouvements ; si vous cherchez à passer à l'échelle, créez des préréglages pour que vos équipes puissent reproduire facilement les résultats. Lors de l'exportation, enregistrez le master sous forme de variantes sans perte ou à débit élevé, puis générez les livrables pour les pipelines de production. Si vous utilisez des packs d'assets de renderforests, vérifiez la compatibilité 4K et la cohérence des couleurs. Que vous soyez un créateur solo ou membre d'une petite équipe, des entrées propres réduisent les retouches et accélèrent la durée de vie du projet. Les préréglages créés pour des genres courants accélèrent la configuration.
Processus étape par étape pour convertir une scène en style dessin animé
Étape 1 – Évaluer la source et définir le concept cible : choisissez une image de prise de vue réelle, notez les mouvements clés et définissez la stylisation souhaitée. Cela crée une structure pour le flux de travail et offre une protection contre le sur-traitement.
Étape 2 – Analyser les mouvements et les poses : suivez les vecteurs de mouvement, exagérez les poses clés et mappez-les sur des silhouettes simplifiées. Cela permet d'assurer la correspondance du rendu final sur les images et de maintenir le rythme.
Étape 3 – Concevoir les personnages et les accessoires : esquissez des silhouettes claires, définissez des caractéristiques distinctives et créez un petit ensemble de formes répétables pour les personnages principaux et secondaires. Cela renforce la cohérence du concept et rend le processus de création efficace.
Étape 4 – Appliquer les calques de stylisation : choisissez une ambiance d'inspiration anime ou un style d'encre audacieux. Créez une structure de calques : couleur de base, ombres, rehauts et line art net pour obtenir un rendu impressionnant et cohérent.
Étape 5 – Traitement des couleurs et des contours : choisissez une palette sobre qui soutient le concept. Utilisez des blocs de couleurs plats, puis ajoutez des ombres subtiles pour suggérer de la profondeur sans altérer l'aspect dessin animé. Cette étape permet de garder des contours nets et rend le résultat directement exportable.
Étape 6 – Examiner, ajuster et exporter : effectuez un rendu d'une courte vidéo ou séquence pour une révision rapide. Vérifiez la cohérence des mouvements, la fidélité des contours et l'équilibre des couleurs. Si nécessaire, ajustez l'épaisseur des lignes ou la saturation et exportez à nouveau pour préserver la qualité.
Étape 7 – Enregistrer un modèle réutilisable pour l'éducation et les projets futurs : stockez la structure et les règles comme une ressource gratuite pour la communauté des créateurs. Le modèle stocké offre un chemin direct pour créer instantanément des assets vidéo stylisés à partir de nouveau matériel.
Comment comparer les générateurs d'animations IA : fonctionnalités importantes
Recommandation : Choisissez un générateur avec un flux de travail basé sur des scripts, une protection solide des assets et une boucle d'aperçu rapide pour gagner du temps tout en gardant le contrôle du rendu. Privilégiez les outils conçus pour les créateurs afin de produire des résultats soignés rapidement et de manière fiable, en soutenant votre travail à chaque étape.
Le support d'entrée est important : vérifiez la compatibilité étendue des sources, y compris la vidéo réelle, les séquences d'images et les prompts textuels. Préférez les produits prenant en charge l'importation par glisser-déposer, le traitement par lots et une gestion cohérente des couleurs pour réduire les modifications manuelles dans votre pipeline existant.
Qualité vs rapidité : évaluez la fidélité, le réalisme des mouvements et le comportement de l'éclairage. Recherchez des préréglages cinématographiques, un éclairage réglable, des détails de texture et la possibilité de définir la résolution et la fréquence d'images sans déstabiliser le rendu. Une option solide offre un flux de travail de transformation qui reste impressionnant sous pression.
Personnalisation et édition : inspectez l'organisation de la structure et si les préréglages sont modulaires. Vérifiez les contrôles fins pour le line art, les ombres et les courbes de mouvement, ainsi qu'un système de script ou de macro accessible qui vous permet d'automatiser les modifications répétitives avec un minimum d'effort.
Contrôle et automatisation : assurez une interface utilisateur claire avec un contrôle visible des paramètres, la possibilité de sauvegarder et de réutiliser les préréglages, et des options d'annulation fiables. Recherchez des points d'intégration d'automatisation qui permettent une intégration dans votre flux de travail basé sur des scripts, juste assez d'automatisation pour accélérer la production.
Protection et licence : confirmez les options de filigrane, les conditions de licence et les droits de réutilisation pour les pipelines de produits commerciaux. Le rendu accéléré par GPU ou basé sur le cloud doit inclure des conditions claires afin que vous puissiez planifier le marketing et la distribution sans surprises.
Collaboration pour le travail de vlog et de marketing : évaluez le montage multi-utilisateurs, le partage de projets et les fonctionnalités d'aperçu en direct qui prennent en charge les retours juste à temps. Ces capacités permettent de transformer les briefs en contenu prêt à être publié et de maintenir un aspect cohérent entre les épisodes.
Matériel et performances : comparez les exigences de calcul, les options cloud vs sur appareil, et si la solution est accélérée par GPU. Assurez-vous que votre configuration répond aux besoins en RAM et en GPU pour éviter les goulots d'étranglement pendant la production.
Prix et retour sur investissement : faites correspondre les niveaux de prix au volume de production attendu, à la qualité de l'exportation et au support continu. Privilégiez les produits avec des coûts prévisibles, des limites d'essai généreuses et des licences claires afin que votre équipe puisse évoluer sans surprises, en particulier pour les campagnes marketing.
Liste de contrôle pour une évaluation rapide : formats d'entrée, contrôles de fidélité, structure, profondeur de personnalisation, outils d'édition, support de script, options de protection, formats d'exportation et points d'intégration pour votre flux de travail. Utilisez cette grille pour choisir un produit qui correspond à vos besoins.
Conseils pour éviter les artefacts et maintenir la cohérence des mouvements
Commencez par un passage hors ligne de 2 à 4 secondes sur un plan simple à l'aide de votre toolkit vidéo-à-vidéo basé sur l'IA. Effectuez le rendu à la résolution cible après un rapide contrôle qualité, ajustez les champs de mouvement et vérifiez les artefacts dans un segment en boucle. Gardez cet échantillon de test représentatif de votre concept final afin de pouvoir régler les paramètres avant la production finale.
- Dérive de mouvement et alignement des images : visez ≤1,5 px de translation par image et ≤0,2° de rotation. Utilisez l'alignement par flux optique et un passage de lissage temporel de 3 images (0,65–0,8) pour maintenir la cohérence sur plusieurs secondes.
- Stabilité des contours et des lignes : appliquez un léger débruitage préservant les contours ; limitez le netteté pour éviter les halos ; maintenez les contours des personnages nets pour éviter le scintillement lors des transitions de mouvement.
- Guidage par modèle pour préserver le style : sélectionnez un petit ensemble de modèles pour le style de mouvement et assurez-vous que les transformations préservent l'intégrité de la silhouette. Réutilisez les préréglages pour éviter la dérive et simplifier la production, vous aidant ainsi à transformer les idées sans perdre l'identité du personnage.
- Cohérence des couleurs et de l'éclairage : verrouillez la balance des blancs sur une référence fixe ; imposez une palette de couleurs stable. Surveillez le deltaE entre les images (cible ≤3) pour maintenir un aspect uniforme sur la séquence.
- Résolution et profondeur de couleur : travaillez en couleur 10 bits si possible ; choisissez un débit binaire suffisamment élevé pour éviter le banding ; maintenez l'échantillonnage de chroma cohérent avec votre pipeline (4:2:2 ou 4:2:0) pour des dégradés fluides lors des mouvements.
- Confidentialité et flux de travail hors ligne : traitez localement pendant les étapes d'éducation et de production précoce ; évitez les exportations dans le cloud jusqu'au passage final pour préserver la confidentialité du matériel source.
- Contrôles qualité et métriques : exécutez des benchmarks SSIM et PSNR sur 3 à 5 courts intervalles par clip ; visez SSIM ≥ 0,92 et PSNR ≥ 28 dB ; signalez les images avec de grandes différences temporelles pour des corrections ciblées.
- Boucle de révision itérative : conservez un journal des modifications de paramètres et des résultats ; transformez les paramètres réussis en modèles réutilisables afin que n'importe qui puisse reproduire le résultat instantanément.
- Détection d'artefacts lors de la révision : activez un simple détecteur d'artefacts pour marquer le scintillement, les décalages de couleur et les artefacts de contour ; corrigez les images signalées avant de passer à la production finale.
- Cycle de vie et alignement narratif : assurez-vous que les ajustements préservent le concept du créateur et la cohérence des personnages, afin que le récit reste captivant tout en maintenant la fluidité des visuels entre les plans.


