
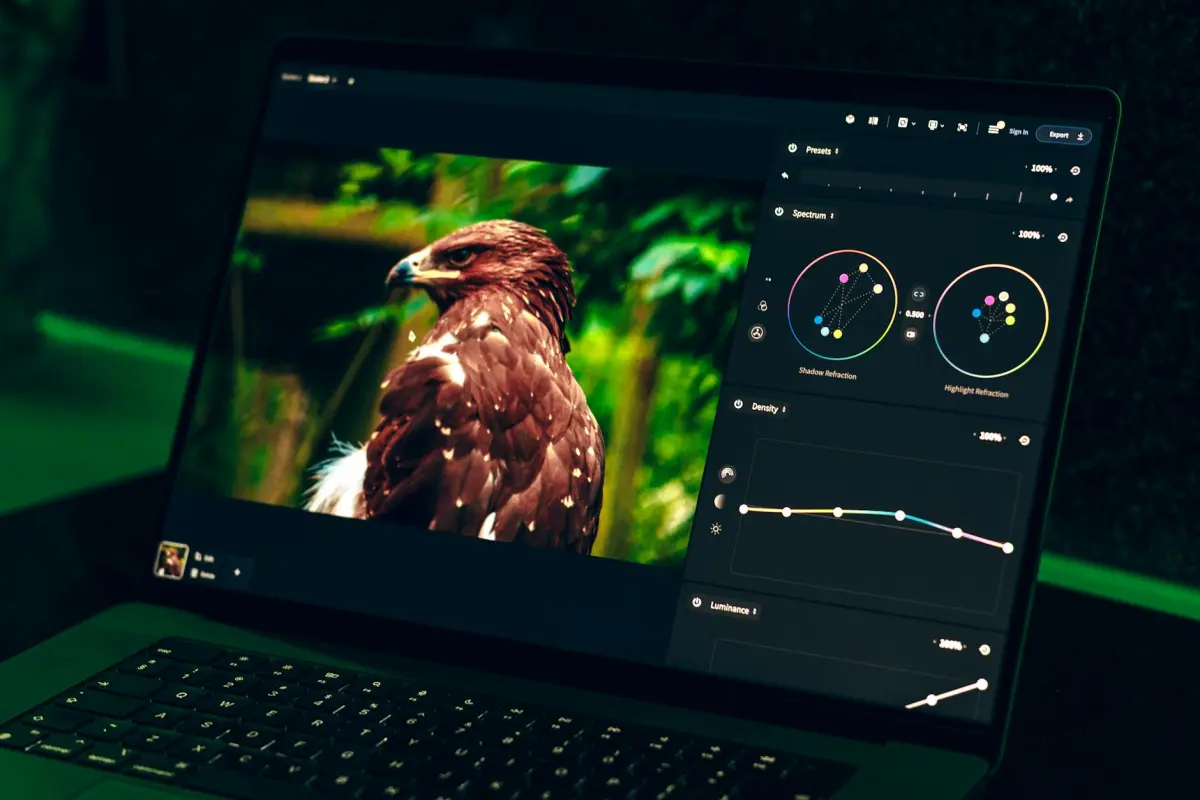

Ξεκινήστε πάντα γρήγορα με μια αυτόματη προεπισκόπηση έντεκα σουιτών ρύθμισης απόχρωσης, εστιάζοντας σε συνδυασμένους τύπους, πολλαπλές ενσωματώσεις plugin, προεπισκοπήσεις σε πραγματικό χρόνο, δουλεύοντας μέσα σε δημοφιλείς hosts. Όλα ευθυγραμμίζονται με μια μη καταστροφική ροή εργασίας, καθιστώντας τις ακριβείς ρυθμίσεις ευκολότερες.
Η επιλογή σας ενσωματώνεται με το premiere, προσφέροντας μη καταστροφικές LUTs, στρώσεις καμπύλης. Το colorio παρέχει στοχευμένο έλεγχο στην έκθεση, την αντίθεση, τις χρωματικές αποχρώσεις μέσω κόμβων. Μπορείτε να αλλάξετε τύπους με ένα μόνο κλικ, συνήθως με προεπιλογές με την ονομασία 'Classic', 'Warmth', 'Cinematic'. Η ροή εργασίας υποστηρίζει ένα μοντέλο plugin με opusclips, wilson presets. Το παράθυρο προεπισκόπησης δείχνει το αποτέλεσμα σε πραγματικό χρόνο, εντελώς ανταποκριτικό. Η διαμόρφωση γίνεται απαραίτητη για να διασφαλιστεί η συνέπεια, λειτουργώντας σε έναν host που υποστηρίζει plugins, συν μια GPU που επιτρέπει ταχύτερη επεξεργασία. Μόλις διαμορφωθούν, οι αλλαγές διαδίδονται άμεσα.
Για συγκεκριμένα έργα, ο συνδυασμός απέχει περισσότερο από μια ντουζίνα κλικ από ένα τελικό look. Μπορείτε να εφαρμόσετε ξεχωριστές περνώντας για να τονίσετε τους τόνους του δέρματος, τους ουρανούς, τις σκιές, αλλάζοντας μόνο αυτό που έχει σημασία. Το σύστημα υποστηρίζει πολλαπλές χρωματικές αποχρώσεις, συνδυασμένο φωτισμό. Μπορείτε να αποθηκεύσετε ένα σύνολο ρυθμίσεων ως πρότυπο, δημιουργώντας επαναλήψιμα looks σε έργα. Ένα ελαφρύ plugin από το opusclips επιταχύνει την απόδοση προεπισκόπησης. Οι προεπιλογές wilson-grade προσθέτουν μια διακριτική κινηματογραφική αφή.
Συνήθως αξιολογείτε σε τρία δείγματα κλιπ – με αντίθετο φωτισμό, συννεφιασμένη μέρα, εσωτερικό – για να επαληθεύσετε τη συνέπεια. Ξεκινήστε με μια ουδέτερη βάση: απενεργοποιήστε το αυτόματο, συγκρίνετε τα πρωτότυπα καρέ με τα τροποποιημένα, βεβαιωθείτε ότι οι τόνοι φαίνονται φυσικοί. Δοκιμάστε γρήγορες ρυθμίσεις μέσω των καμπυλών έκθεσης του colorio, ρυθμίζοντας τα φωτεινά σημεία, τους μεσαίους τόνους, τις σκιές σε ξεχωριστές περνώντας. Αν ένα κλιπ φαίνεται αλλαγμένο στα φωτεινά σημεία, δοκιμάστε μια αποκλειστική πάσα χρησιμοποιώντας τους μικρο-ελέγχους του plugin. Εφαρμόστε μια δεύτερη πάσα μέσω της καμπύλης υψηλής αντίθεσης του colorio, ρυθμίστε τον κορεσμό εντός στενών ορίων. Αυτή η προσέγγιση παραμένει συνεπής σε όλους τους επεξεργαστές, ευθυγραμμιζόμενη με το οικοσύστημα plugin του opusclips.
Πρακτική Επισκόπηση: Από Βοηθήματα έως Καθημερινή Ροή Εργασίας Ρύθμισης Απόχρωσης
Ορίστε μια βάση βαθμονομώντας την οθόνη macos έναντι μιας λευκής αναφοράς. Κλειδώστε τη φωτεινότητα. Αποθηκεύστε το αποτέλεσμα ως μια καθολική προεπιλογή επιπέδου για εφαρμογή σε όλες τις σκηνές.
Ξεκινήστε με μια χειροκίνητη πάσα για να επιτύχετε μια φυσική, κινηματογραφική τονική ισορροπία. Ρυθμίστε το σημείο λευκού, τις σκιές, τους μεσαίους τόνους με άμεσες ρυθμίσεις στα επίπεδα. Επαληθεύστε στην οθόνη για να διατηρήσετε τη συνέπεια.
Διαφορετικές λήψεις απαιτούν δοκιμή σε 3-5 κλιπ. Συγκρίνετε τι χρειάζεται κάθε λήψη. Καταγράψτε τις αλλαγές στο excel για να παρακολουθείτε τις επιμένουσες σε σύνολα δεδομένων και τις οδηγίες του πελάτη.
Δοκιμάστε ελαφριές διαδικτυακές ελέγχους με το lunapic. Χρησιμοποιήστε μια προεπιλογή αποθήκευσης για να διατηρήσετε χαμηλή προσπάθεια, διατηρώντας παράλληλα ένα γυαλισμένο look σε συνδυασμένες πηγές, συμπεριλαμβανομένων ταινιών και ψηφιακών λήψεων.
Αποφύγετε την υπερβολική αύξηση του κορεσμού. Βασιστείτε σε μια απλή προσέγγιση για την παρακολούθηση της φωτεινότητας. Εισάγετε μια σαφή πορεία από την εισαγωγή προς το τελικό αποτέλεσμα, ευθυγραμμισμένη με την οδηγία του πελάτη.
Αυτή η ροή εργασίας συνήθως προσαρμόζεται σε ρυθμίσεις macos. Το υλικό κυμαίνεται από μια βασική οθόνη έως μια εξελιγμένη μηχανή. Ταιριάζει τόσο σε ατομικά έργα όσο και σε εργασία για πελάτες που απαιτεί μέτρια προσπάθεια, συνεπή πρακτική.
Τι μαθαίνετε: κρατήστε τα σημεία απόφασης ρητά. Αποθηκεύστε το καθολικό επίπεδο ως πρότυπο. Χρησιμοποιήστε συνδυασμένες πηγές χωρίς να θυσιάζετε φυσικά αποτελέσματα. Βεβαιωθείτε ότι το τελικό look παραμένει άμεσα ευθυγραμμισμένο με την οδηγία.
Επιλέξτε Μεταξύ Δωρεάν και Επί Πληρωμή: Κενά χαρακτηριστικών και σημεία αξίας
Η έναρξη με ένα δωρεάν επίπεδο είναι συνετή για την επικύρωση της συμβατότητας. Αν και περιορισμένο, δείχνει αν οι λήψεις σας ευθυγραμμίζονται με μια δεδομένη πλατφόρμα, όπως το tiktok. Ελέγξτε τη συνέπεια μεταξύ των καναλιών.
Εμπόδιο: υδατογράφημα στις εξαγωγές. Όρια εξαγωγής. Περιορισμένες LUTs. Χωρίς μαζική επεξεργασία. Χειροκίνητες ρυθμίσεις μέσω βασικών sliders.
Οι επί πληρωμή επιλογές αφαιρούν υδατογραφήματα. ανοίγουν υψηλότερες αναλύσεις εξαγωγής (4K). μαζική απόδοση. βιβλιοθήκη premium LUT. ενσωμάτωση Lumetri σε ροές εργασίας. ταχύτερη απόδοση σε ικανό υλικό. συνέπεια μεταξύ έργων. αυτόματη αντιστοίχιση λήψεων. πιστώσεις cloud. δυνατότητες συνεργασίας.
Οι δωρεάν επιλογές περιλαμβάνουν το lunapic για γρήγορες ρυθμίσεις ισορροπίας λευκού. fotor για προεπιλογές. mediaio για βίντεο ρυθμίσεις. καθένα υποστηρίζει τη μεταφόρτωση πρωτοτύπων. υπάρχουν ενσωματωμένες LUTs, αν και περιορισμένες. κατεβάστε εξόδους όταν είναι έτοιμες. θα δείτε βασικές ρυθμίσεις να προσθέτουν ένα ζωηρό τελείωμα.
εδώ είναι ένας γρήγορος οδηγός για να αποφασίσετε: ξεκινώντας με δωρεάν. αξιολογήστε την ισορροπία λευκού, την απόχρωση, τον κορεσμό. αξιολογήστε τις αντιστοιχίσεις λήψεων μεταξύ των κλιπ. επιβεβαιώστε την αυτόματη προσθήκη LUTs. επαληθεύστε τη ροή εργασίας μεταφόρτωσης στο tiktok ή σε άλλες πλατφόρμες. οι επιλογές πιστώσεων ή οι ανταμοιβές παίζουν ρόλο.
Διόρθωση Χρώματος Πορτρέτων: Επίτευξη Φυσικών Τόνων Δέρματος και Διατήρηση Υφής
Ξεκινήστε με μια βαθμονομημένη αναφορά σε μια ουδέτερη οθόνη. Αγκυρώστε τους τόνους του δέρματος μέσω ενός γκρι σημείου. Η έκθεση είναι κλειδωμένη για να αποφευχθεί η απόκλιση κατά την επεξεργασία. Υιοθετήστε μια εφάπαξ βάση για να επιταχύνετε την επακόλουθη εργασία. Αυτή η χειροκίνητη προσέγγιση έχει σχεδιαστεί για να παρέχει επαγγελματικά αποτελέσματα. Εισάγεται σε πολλές λήψεις από εκπαιδευμένους κινηματογραφιστές σε εκτεταμένα έργα. Το Premiere χειρίζεται γρήγορες ρυθμίσεις με ευκολία ενός κλικ.
Βασική τονικότητα χτισμένη με καμπύλες που ελέγχουν τα φωτεινά σημεία, τους μεσαίους τόνους, τις σκιές. Απομονώστε το δέρμα χρησιμοποιώντας μια απαλή μάσκα. Ρυθμίστε τη μετατόπιση της απόχρωσης εντός στενών ορίων. Ρυθμίστε τον κορεσμό, τη φωτεινότητα για να διατηρήσετε τη φυσική εμφάνιση. Αποφύγετε την ποστεροποίηση διατηρώντας τις βηματικές αλλαγές μικρές. Η υφή παραμένει άθικτη, τραγανή, χωρίς κέρινη εμφάνιση.
- Ρύθμιση Βάσης: χειροκίνητες επεξεργασίες. Η εφάπαξ βάση αγκυρώνει τους τόνους του δέρματος. επαγγελματικό αποτέλεσμα. εκπαιδευμένοι κινηματογραφιστές σε εκτεταμένα έργα έφεραν αυτήν την προσέγγιση. οι επιλογές με ενεργοποίηση Sensei στο Premiere απλοποιούν τις γρήγορες ρυθμίσεις με ευκολία ενός κλικ. οι προσαρμογές βάσης βάσει καμπύλης διατηρούν τη λεπτομέρεια.
- Ισορροπία Τόνου Δέρματος μέσω Ελέγχων HSL: επιλέξτε περιοχή δέρματος με μια απαλή μάσκα. Εφαρμόστε μια μικρή μετατόπιση απόχρωσης, κρατήστε εντός ±4 μοιρών. Κορεστείτε ελάχιστα. Διατηρήστε τη σταθερότητα της φωτεινότητας για να αποφύγετε γκριζωπά μάγουλα.
- Ασφάλεια Υφής: αποφύγετε τη βαριά μείωση θορύβου στο δέρμα. Εφαρμόστε απαλή ευκρίνεια ή μικρο-αντίθεση. Διατηρήστε τους πόρους με ελεγχόμενη μικρο-υφή. Κρατήστε την επιφάνεια από το να φαίνεται κέρινη.
- Συνέπεια Σε Διαφορετικά Κλιπ: χρησιμοποιήστε αντιστοίχιση ενός κλικ ή αντιγραφή/επικόλληση ρυθμίσεων σε σκηνές. Βεβαιωθείτε ότι τα προφίλ φωτισμού παραμένουν ισορροπημένα. Αυτό μειώνει την κόπωση κατά τη διάρκεια μεγάλων έργων. Τα επαγγελματικά looks προκύπτουν από προβλέψιμα looks.
Υπάρχουν εκτιμήσεις κόστους. Ενσωματωμένα εργαλεία στο Premiere, συνδεόμενα plugins τρίτων ή δωρεάν επιλογές. Οι επεκτάσιμες επιλογές ταιριάζουν σε γρήγορες επεξεργασίες, εκτεταμένες ροές εργασίας. Η εκπαίδευση διευρύνει τις επιλογές. Το Sensei AI βοηθά σε γρήγορες επιλογές. Αυτό μειώνει την κόπωση κατά τη διάρκεια μεγάλων έργων. Ένας μεγάλος συνδυασμός μεταξύ ταχύτητας και ακρίβειας παραμένει ο στόχος.
Ψάχνετε να επιταχύνετε τη ροή εργασίας, η βάση ενός κλικ με χειροκίνητες ρυθμίσεις στο Premiere δίνει ένα γρήγορο, ισορροπημένο αποτέλεσμα.
Αυτό το παιχνίδι ισορροπίας τόνου σε διάφορες σκηνές ωφελείται από μια τεκμηριωμένη ροή εργασίας. Η επιλογή της σωστής επιλογής εξαρτάται από το πλαίσιο του έργου. Η κόπωση παραμένει ελάχιστη, διατηρώντας τη λεπτομέρεια μεταξύ των καρέ.
Ισορροπία Τοπίου και Πραγματικών Σκηνών: Διαχείριση Λεπτομερειών Ουρανού, Φυλλώματος και Σκιάς
Ξεκινήστε προστατεύοντας τα φωτεινά σημεία του ουρανού. Ρυθμίστε την έκθεση για να διατηρήσετε τα φωτεινότερα τόνους ασφαλή, στη συνέχεια αντιμετωπίστε το φύλλωμα, τις λεπτομέρειες σκιάς σε ξεχωριστές περνώντας.
Χρησιμοποιήστε μια προσέγγιση δύο περνών: πρώτα τραβήξτε προς τα κάτω τον υπερ-εκτεθειμένο ουρανό με μια στοχευμένη μάσκα. δεύτερον, ισορροπήστε τους μεσαίους τόνους, τις σκιές, το φύλλωμα, τα φωτεινά σημεία μέσω επιλεκτικών επεξεργασιών.
Για να υποστηρίξετε έναν αρχάριο, μια λιτή ρύθμιση μειώνει τον κίνδυνο. Παρέχει προσιτά αποτελέσματα με σταθερές βελτιώσεις, μειώνοντας το εμπόδιο για τους νεοεισερχόμενους.
Η εργασία πεδίου με προτεραιότητα στο κινητό υποστηρίζει την απλοποιημένη επεξεργασία, ενώ η ομάδα καταγράφει κλιπ, διατηρώντας τις προσαρμογές ομοιόμορφες σε όλες τις λήψεις. Αυτό μειώνει την πολυπλοκότητα, επιταχύνει την παράδοση, παρέχει μια απλοποιημένη πορεία, βοηθά άμεσα στη συνέπεια της εικόνας.
Όπως ζητήθηκε από τους πελάτες, το lunapic μπορεί να παρέχει γρήγορες διορθώσεις εν κινήσει. Χρησιμοποιήστε το ως εκπαιδευτική αρένα, στη συνέχεια μεταφέρετε σε λογισμικό επεξεργασίας για να εμβαθύνετε τις επεξεργασίες εάν χρειαστεί.
Τα επαγγελματικά looks βασίζονται σε μερικές βασικές ρυθμίσεις: διατήρηση υφής στις σκιές. ανάκτηση λεπτομερειών φωτεινών σημείων. διατήρηση αρμονίας χρωμάτων μεταξύ καναλιών. αυτές είναι κατάλληλες αποφάσεις επεξεργασίας που υπερέχουν όταν οι δυνατότητες ευθυγραμμίζονται με την εργασία.
Υπάρχουν κόστη, δαπάνες, μήνες πρακτικής. Οι αρχάριοι συνήθως παραμένουν κάτω από έναν μέτριο προϋπολογισμό, οι επαγγελματικές ροές εργασίας γίνονται άξιες επενδύσεις. Υπάρχει η δυνατότητα να παράγετε αποτελέσματα γρηγορότερα, να μειώσετε τις αναθεωρήσεις, να παραδώσετε μια επαγγελματικά φαινόμενη εικόνα.
Για να διασφαλίσετε ένα σταθερό, επαναλαμβανόμενο αποτέλεσμα, τεκμηριώστε μια γρήγορη ροή εργασίας: επεξεργαστείτε, κάντε render, ελέγξτε, αποθηκεύστε ως ενιαία προκαθορισμένα στοιχεία. Αυτό μετατρέπει ασταθείς λήψεις σε επιτυχίες, προσφέροντας σταθερά επαγγελματική εμφάνιση σε ένα έργο. Φωτογράφιση προϊόντων: Ακρίβεια χρωμάτων, ισορροπία λευκού και συνέπεια μεταξύ των λήψεων Ξεκινήστε με μια σταθερή ισορροπία λευκού χρησιμοποιώντας μια ουδέτερη γκρι αναφορά, τραβήξτε σε RAW και κλειδώστε την έκθεση. Αυτό **δίνει** μια αξιόπιστη βάση για τη διασφάλιση της πιστότητας των αποχρώσεων σε όλες τις λήψεις και διατηρεί το θέμα να φαίνεται **όμορφο** σε διαφορετικά καρέ.
Χρησιμοποιήστε την **αυτόματη ισορροπία** ως βάση, αλλά επαληθεύστε με χειροκίνητες προσαρμογές. Μια **ενσωματωμένη** ροή εργασίας που εφαρμόζει την ίδια αναφορά σε κάθε καρέ βοηθά στη διατήρηση ρεαλιστικών τόνων και μειώνει την απόκλιση όταν η φωτεινότητα αλλάζει.
Η **αρχική** βαθμονόμηση και μερικά **στυλ** ταιριάζουν σε κάθε οικογένεια προϊόντων. Η **δημιουργία** προκαθορισμένων στοιχείων εξοικονομεί προσπάθεια, διασφαλίζει μια συνεπή αίσθηση σε όλο το **έργο** και επιτρέπει σε άλλα μέλη της ομάδας να αναπαράγουν την επιθυμητή εμφάνιση και να τις επαναχρησιμοποιήσουν σε λήψεις. Η προσέγγιση **ταιριάζει** σε καμπάνιες.
Βαθμονομήστε τα εργαλεία σας και την οθόνη τακτικά. Δημιουργήστε μια **βιβλιοθήκη** βημάτων βαθμονόμησης και προφίλ φωτισμού. Εφαρμόστε **φίλτρα** που εναρμονίζουν τις σκιές και τα φώτα, και διατηρήστε την **ισορροπία** μεταξύ **πολλαπλών** λήψεων για να αποτρέψετε την απόκλιση.
Το **CapCut** μπορεί να επιταχύνει την μετα-επεξεργασία των **βίντεο**. Ξεκινήστε με το **auto**, στη συνέχεια βελτιώστε **χειροκίνητα**. Η **αυτόματη ισορροπία** του CapCut υποστηρίζει ένα γρήγορο πέρασμα, ενώ το **colourlabai** μπορεί να προσφέρει υπέροχες βελτιώσεις, καταλήγοντας στην τελική βαθμονόμηση. **Κατεβάστε** το colourlabai και ενσωματώστε το στο **έργο** για να αποκτήσετε πρόσβαση σε **αλγορίθμους** και μια ισχυρή **βιβλιοθήκη** εμφανίσεων.
Διασφαλίστε ότι ο φωτισμός είναι **επαρκής**. Χρησιμοποιήστε προφίλ **lightx** για να προσομοιώσετε **πραγματικές** σκηνές και δοκιμάστε διαφορετικές ρυθμίσεις. Αυτό **σας δίνει** την **ικανότητα** να αλλάξετε διάθεση χωρίς να χρειαστεί να ξαναχτίσετε την βασική ισορροπία, διατηρώντας άθικτο το **αρχικό** σημείο.
Δημιουργήστε μια απλή ροή εργασίας: καταγράψτε με μια σταθερή αναφορά, καταγράψτε τις **αλλαγές** και αποθηκεύστε τις ρυθμίσεις σε μια **βιβλιοθήκη**. Αυτό **υποστηρίζει** τη συνέπεια μεταξύ των συνεδριών και βοηθά όταν επανέρχεστε σε ένα **έργο** μετά από ένα διάλειμμα, διασφαλίζοντας τη συνοχή μεταξύ των συσκευών.
Πριν την εξαγωγή, επαληθεύστε σε μερικές οθόνες για να επιβεβαιώσετε ότι οι αποχρώσεις παραμένουν αρμονικές **μεταξύ** των οθονών. Δοκιμάστε σε **πολλά** **βίντεο** και εξασφαλίστε ένα **όμορφο** αποτέλεσμα που ταιριάζει σε κάθε κανάλι.
Αποδοτικότητα ροής εργασίας: Προκαθορισμένα στοιχεία, μαζική επεξεργασία και μη καταστροφικές επεξεργασίες
Ξεκινήστε με ένα κιτ προκαθορισμένων στοιχείων εστιασμένο στον δημιουργό που μπορείτε να εφαρμόσετε σε όλα τα κανάλια. Αυτό διατηρεί την εργασία καθαρή, ομαλή, ενώ παραμένει μη καταστροφική.
Επιλέξτε προκαθορισμένα στοιχεία που είναι σίγουρο ότι καλύπτουν κοινές σκηνές. Αυτά που σχεδιάστηκαν μέσω μιας εφάπαξ ρύθμισης που εφαρμόζεται σε διάφορες λήψεις. Αυτό μειώνει την ανάγκη χειροκίνητης ρύθμισης κάθε καρέ, διατηρεί τις ίδιες εμφανίσεις μεταξύ των εμπορικών σημάτων. Εξοικονομεί χρόνο για colorists, ομάδες δημιουργών.
Σκεφτείτε γιατί αυτό είναι σημαντικό. Αυτή η προσέγγιση απλοποιεί τις τυπικές εργασίες, υποστηρίζει τα όρια του προϋπολογισμού, ενώ επιτρέπει απότομη αύξηση της παραγωγικότητας.
Είτε πρόκειται για φως ημέρας είτε για φωτισμό στούντιο, το πλαίσιο παραμένει σταθερό, επιτρέποντας συνεπή τονικότητα.
Οι κανόνες μαζικής επεξεργασίας στο macos αυτοματοποιούν μια ενιαία γραμμή εργασίας. Το μηχάνημα χειρίζεται τις τυπικές επεξεργασίες. Οι colorists κερδίζουν χώρο, διορθώνοντας λεπτά προβλήματα χειροκίνητα στο πρόσωπο. Μια προεπισκόπηση βαθμονόμησης βοηθά στην έγκαιρη ανίχνευση αποκλίσεων, διασφαλίζοντας ταιριαστό τόνο μεταξύ των κλιπ.
Ετήσια βάση: μια τυπική αλυσίδα περιλαμβάνει μια καθαρή προεπισκόπηση, έναν γρήγορο έλεγχο στις περιοχές του προσώπου, καθώς και μια εφάπαξ ρύθμιση που καλύπτει τις περισσότερες σκηνές. Επαναλαμβάνετε μέσω καναλιών χωρίς να χάσετε την βασική εμφάνιση.
Περιλαμβάνει μεταδεδομένα για γρήγορη επαναχρησιμοποίηση σε εμπορικά σήματα. Υποστηρίζει τις προτιμήσεις ταιριαστού τόνου των colorists. Παραμένει χρήσιμο κατά την εναλλαγή μεταξύ συσκευών macos.
Όταν τα εμπορικά σήματα δεν μπορούν να καλύψουν όλες τις ανάγκες, αυτό το πλαίσιο επεκτείνεται μέσω ενοτήτων. Μια εφάπαξ ρύθμιση παραμένει ενημερωμένη.
Σκεφτείτε την πειθαρχία. Αυτά τα βήματα απαιτούν πειθαρχία κατά την κλιμάκωση. Προσεκτικοί έλεγχοι σε κάθε στάδιο διατηρούν συνεπή τα αποτελέσματα. Εδώ λάμπουν τα υπέροχα, εξελιγμένα προκαθορισμένα στοιχεία.
Εξετάστε αυτήν την προσέγγιση όταν οι προϋπολογισμοί είναι περιορισμένοι: μια απότομη καμπύλη εκμάθησης οδηγεί σε μεγάλη παραγωγικότητα. Μια εξελιγμένη τράπεζα προκαθορισμένων στοιχείων παραμένει ευέλικτη σε όλες τις μάρκες. Αυτή η ρύθμιση επεκτείνεται μέσω καναλιών χρόνο με τον χρόνο.
Ξεκινήστε με μια σταθερή ισορροπία λευκού χρησιμοποιώντας μια ουδέτερη γκρι αναφορά, τραβήξτε σε RAW και κλειδώστε την έκθεση. Αυτό **δίνει** μια αξιόπιστη βάση για τη διασφάλιση της πιστότητας των αποχρώσεων σε όλες τις λήψεις και διατηρεί το θέμα να φαίνεται **όμορφο** σε διαφορετικά καρέ.
Χρησιμοποιήστε την **αυτόματη ισορροπία** ως βάση, αλλά επαληθεύστε με χειροκίνητες προσαρμογές. Μια **ενσωματωμένη** ροή εργασίας που εφαρμόζει την ίδια αναφορά σε κάθε καρέ βοηθά στη διατήρηση ρεαλιστικών τόνων και μειώνει την απόκλιση όταν η φωτεινότητα αλλάζει.
Η **αρχική** βαθμονόμηση και μερικά **στυλ** ταιριάζουν σε κάθε οικογένεια προϊόντων. Η **δημιουργία** προκαθορισμένων στοιχείων εξοικονομεί προσπάθεια, διασφαλίζει μια συνεπή αίσθηση σε όλο το **έργο** και επιτρέπει σε άλλα μέλη της ομάδας να αναπαράγουν την επιθυμητή εμφάνιση και να τις επαναχρησιμοποιήσουν σε λήψεις. Η προσέγγιση **ταιριάζει** σε καμπάνιες.
Βαθμονομήστε τα εργαλεία σας και την οθόνη τακτικά. Δημιουργήστε μια **βιβλιοθήκη** βημάτων βαθμονόμησης και προφίλ φωτισμού. Εφαρμόστε **φίλτρα** που εναρμονίζουν τις σκιές και τα φώτα, και διατηρήστε την **ισορροπία** μεταξύ **πολλαπλών** λήψεων για να αποτρέψετε την απόκλιση.
Το **CapCut** μπορεί να επιταχύνει την μετα-επεξεργασία των **βίντεο**. Ξεκινήστε με το **auto**, στη συνέχεια βελτιώστε **χειροκίνητα**. Η **αυτόματη ισορροπία** του CapCut υποστηρίζει ένα γρήγορο πέρασμα, ενώ το **colourlabai** μπορεί να προσφέρει υπέροχες βελτιώσεις, καταλήγοντας στην τελική βαθμονόμηση. **Κατεβάστε** το colourlabai και ενσωματώστε το στο **έργο** για να αποκτήσετε πρόσβαση σε **αλγορίθμους** και μια ισχυρή **βιβλιοθήκη** εμφανίσεων.
Διασφαλίστε ότι ο φωτισμός είναι **επαρκής**. Χρησιμοποιήστε προφίλ **lightx** για να προσομοιώσετε **πραγματικές** σκηνές και δοκιμάστε διαφορετικές ρυθμίσεις. Αυτό **σας δίνει** την **ικανότητα** να αλλάξετε διάθεση χωρίς να χρειαστεί να ξαναχτίσετε την βασική ισορροπία, διατηρώντας άθικτο το **αρχικό** σημείο.
Δημιουργήστε μια απλή ροή εργασίας: καταγράψτε με μια σταθερή αναφορά, καταγράψτε τις **αλλαγές** και αποθηκεύστε τις ρυθμίσεις σε μια **βιβλιοθήκη**. Αυτό **υποστηρίζει** τη συνέπεια μεταξύ των συνεδριών και βοηθά όταν επανέρχεστε σε ένα **έργο** μετά από ένα διάλειμμα, διασφαλίζοντας τη συνοχή μεταξύ των συσκευών.
Πριν την εξαγωγή, επαληθεύστε σε μερικές οθόνες για να επιβεβαιώσετε ότι οι αποχρώσεις παραμένουν αρμονικές **μεταξύ** των οθονών. Δοκιμάστε σε **πολλά** **βίντεο** και εξασφαλίστε ένα **όμορφο** αποτέλεσμα που ταιριάζει σε κάθε κανάλι.
Αποδοτικότητα ροής εργασίας: Προκαθορισμένα στοιχεία, μαζική επεξεργασία και μη καταστροφικές επεξεργασίες
Ξεκινήστε με ένα κιτ προκαθορισμένων στοιχείων εστιασμένο στον δημιουργό που μπορείτε να εφαρμόσετε σε όλα τα κανάλια. Αυτό διατηρεί την εργασία καθαρή, ομαλή, ενώ παραμένει μη καταστροφική.
Επιλέξτε προκαθορισμένα στοιχεία που είναι σίγουρο ότι καλύπτουν κοινές σκηνές. Αυτά που σχεδιάστηκαν μέσω μιας εφάπαξ ρύθμισης που εφαρμόζεται σε διάφορες λήψεις. Αυτό μειώνει την ανάγκη χειροκίνητης ρύθμισης κάθε καρέ, διατηρεί τις ίδιες εμφανίσεις μεταξύ των εμπορικών σημάτων. Εξοικονομεί χρόνο για colorists, ομάδες δημιουργών.
Σκεφτείτε γιατί αυτό είναι σημαντικό. Αυτή η προσέγγιση απλοποιεί τις τυπικές εργασίες, υποστηρίζει τα όρια του προϋπολογισμού, ενώ επιτρέπει απότομη αύξηση της παραγωγικότητας.
Είτε πρόκειται για φως ημέρας είτε για φωτισμό στούντιο, το πλαίσιο παραμένει σταθερό, επιτρέποντας συνεπή τονικότητα.
Οι κανόνες μαζικής επεξεργασίας στο macos αυτοματοποιούν μια ενιαία γραμμή εργασίας. Το μηχάνημα χειρίζεται τις τυπικές επεξεργασίες. Οι colorists κερδίζουν χώρο, διορθώνοντας λεπτά προβλήματα χειροκίνητα στο πρόσωπο. Μια προεπισκόπηση βαθμονόμησης βοηθά στην έγκαιρη ανίχνευση αποκλίσεων, διασφαλίζοντας ταιριαστό τόνο μεταξύ των κλιπ.
Ετήσια βάση: μια τυπική αλυσίδα περιλαμβάνει μια καθαρή προεπισκόπηση, έναν γρήγορο έλεγχο στις περιοχές του προσώπου, καθώς και μια εφάπαξ ρύθμιση που καλύπτει τις περισσότερες σκηνές. Επαναλαμβάνετε μέσω καναλιών χωρίς να χάσετε την βασική εμφάνιση.
Περιλαμβάνει μεταδεδομένα για γρήγορη επαναχρησιμοποίηση σε εμπορικά σήματα. Υποστηρίζει τις προτιμήσεις ταιριαστού τόνου των colorists. Παραμένει χρήσιμο κατά την εναλλαγή μεταξύ συσκευών macos.
Όταν τα εμπορικά σήματα δεν μπορούν να καλύψουν όλες τις ανάγκες, αυτό το πλαίσιο επεκτείνεται μέσω ενοτήτων. Μια εφάπαξ ρύθμιση παραμένει ενημερωμένη.
Σκεφτείτε την πειθαρχία. Αυτά τα βήματα απαιτούν πειθαρχία κατά την κλιμάκωση. Προσεκτικοί έλεγχοι σε κάθε στάδιο διατηρούν συνεπή τα αποτελέσματα. Εδώ λάμπουν τα υπέροχα, εξελιγμένα προκαθορισμένα στοιχεία.
Εξετάστε αυτήν την προσέγγιση όταν οι προϋπολογισμοί είναι περιορισμένοι: μια απότομη καμπύλη εκμάθησης οδηγεί σε μεγάλη παραγωγικότητα. Μια εξελιγμένη τράπεζα προκαθορισμένων στοιχείων παραμένει ευέλικτη σε όλες τις μάρκες. Αυτή η ρύθμιση επεκτείνεται μέσω καναλιών χρόνο με τον χρόνο.


